Showing posts with label gauze trim. Show all posts

Saturday, January 28, 2012

{a birthday surprise and a money saver too}

Just when I resign myself to the fact that the days of {birthday woo-hoos!} are a thing of the past, my sweet daughter's surprise me with a very special gift. ...
... there is no end to the nice things that these three {young ladies} have done for me as of late. They have stepped in and taken over the most undesirable chores. They have goofed and joked and hooted until I have no choice but to hoot along. They have gone out of their individual ways to make me {smile} lately and I love them even more deeply for this. ...  
... for a long time now I have wanted this  - {see below}          
... a {kindle fire}. I am doing a major happy dance over here! 
I {LOVE LOVE LOVE}  to read and my {sweet girls} know it.
Of course they were kind enough to buy a cover to go along with this beautiful device, but upon opening it {they were as giddy as I was when it came to the unveiling} we realized that they had mistakenly purchased the cover for a {kindle touch}. Their collective thought was {bummer}. My next thought was {whew!} They had already spent WAY TOO MUCH on mom and I was happy to have them return it...
 ...SO today I decided to make one...BEFORE they could sneak off to yet another store to find another cover for me...
... you know I {LOVE WHITE} and {VINTAGE} anything, so I dug around my studio and found some fabric that was perfect for the job. Quilted. Antique white. Perfect.
... I ruffled four layers of antique gold tulle ...
...  added a layer of beautifully scrunched silky floral trim ...
... and a touch of looped vintage pink seam binding ...
... added some vintage eyelet ribbon for a tie closure ...
... I started this little project in order to save my girls a few dollars, but ended the day with a beautiful cover for my {reader} that I just adore ...

... and so it was a lovely birthday gift. A beautiful surprise. ...
... and a money saver too! ...
Enjoy!

Thursday, September 15, 2011

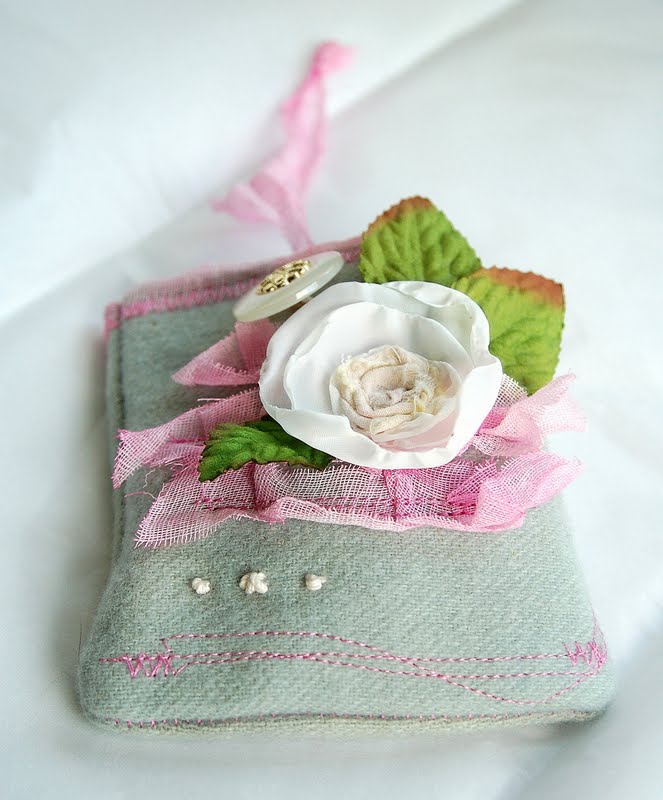
{day 4 . a gauzy ruffled wool pouch}

Here I am with another project using this beautiful {inky vintage gauze trim}...

... and as adorable as I think it is, I must preclude this post with a confession. I love this little pouch because it's style closely resembles the beautiful little bags made by my friend, Roben-Marie over at Every Life Has A Story. She always creates the most beautiful bags and journals. I love everything she does...

...so while I did not start out this little bag thinking that it would look like one of hers, it just took a turn somewhere along the way because that is my favorite style.
 I was actually practicing a little sewing and one thing led to the next...
 ...I even remembered to line the bag - well half of the bag. Yes, you heard me right. I only made enough liner for one half of the bag...don't ask, because I just don't know!
 ...hence, the practice pouch.
 I used some hand dyed wool I had leftover from a recent pillow project, and added three yummy rows of that sweet and simple {vintage hand dyed trim} that I have been featuring in my etsy shoppe, all week long.
 I layered on a ruffled silk flower I made with a center that I created using leftover dyed muslin.
 I did a little free form stitching {love it} on the front panel of the wool...
 added some leaves, a vintage button, and some french knots tied with some vintage baker's twine I had in my stash...I used another piece of the {peony vintage dyed gauze trim}to create a tie. I use this to wrap around the button for a casual closure to the pouch.
 More {vintage gauze} in that delicious {peony color} was used as a lip on the pouch, for the finishing trim. While digging in my treasure trove of old thread, I found some pink silk that was actually in great condition...Love it!

 Lovely photograph showing the top panel of this little pouch lined...bottom panel NOT lined...
You can also see that my stitching is not perfect, but it is okay. I like the "timeworn" look.
{that is what I like to call it when I can't sew so great - "timeworn!"}
A hand dyed piece of muslin, in pale mustard adorns the bottom back panel. I hand stamped it with a stamp that I actually carved at a recent retreat with friends. I LOVE IT!
...so it is not a perfect pouch, but a practice pouch...and I think it is super sweet!
The look of it is just what I wanted...my daughter is already asking for it for her birthday!
That made me feel pretty good...half liner and all!
And as always, if you make a project with any of the new {vintage inky gauze trim}
from the etsy shoppe I would love to see a photograph! I will even post it here!

Wednesday, September 14, 2011

{day 3. pin cushion with vintage gauze trim}

So I know that I have been going crazy with this {inky vintage gauze trim} but I just can't get enough of it. Today I used it as a shabby ruffled trim on a pin cushion I fashioned from a few scraps of muslin.


That tiny cream colored flower is from my vintage findings collection. I use them sparingly as they are so hard to find anymore. This one was part of a tiny "boquet" that still had the stems in tact. I just sewed over the stem a few times to adhere to the front panel of my pin cushion.
 Remember that hand dyed vintage seam binding that I used on that tiny package?
That is the creamy blue trim used to make the tiny rosettes...
I love this paper flower...it was stamped with letters in a really cool circus style font.
 I have been really great about using up what I have on hand lately, so I filled my pin cushion with some leftover "beads" that we needed for a school project. They are most often used to stuff fabric dolls.
Since the muslin is a very think fabric, the beads worked better than the traditional "sand".
No leakage once you have a few pin holes in your fabric.
 Another perk to using the beads, is that the pin cushion will stand quite easily too...
 Of course, the vintage style pins don't hurt either!
 I love the look of the free form stitching, so I just zig zag back and forth over anything I am stitching numerous times...this way it looks random and sweet at the same time.
 See how I stitched the stem? Just a few lines back and forth to tack it down.
 The same with the paper flower...{isn't that dyed gauze trim just yummy?}
 I have made more than a few pin cushions and I like to leave one whole side unstitched to fill it...this way I can hand stitch the last side to look gathered, or ruffled. I love this look. Makes me think of a vintage sack filled with some yummy textile.
 This little project only took about 40 minutes, including gathering supplies. I always take a bit of time laying my design out, so it could go quicker depending on how involved you make your front panel.
If you decide to make a pin cushion with your vintage hand dyed trim I would love to see a photograph of it when it is complete!
Happy Sewing!

Monday, September 12, 2011

{day 2 vintage gauze trim equals super sweet packaging}

I love the packaging of gifts. I could wrap things all day...I get great {JOY} each time I make a special little something and then {WRAP} it all up beautifully! It is almost like getting {TWO PRESENTS IN ONE} when you receive a  gift in precious wrappings.

My new inky gauze vintage trim makes for such a lovely finishing touch on a package. I love the way it looks so time worn and loved.  
This simple brown kraft gift box looks sweet with a piece of dyed vintage seam binding (coming soon to the 723 etsy shoppe) and a vintage lace rosette. Add lovely vintage hat pin and it is a gift worth beholding.


Whether it is a gift, a beautiful piece of mail art, or a simple vase you want to dress up, this vintage style trim adds just the right touch. A double wrap of  this dreamy {CORNFLOWER BLUE} gauzy ribbon looks beautiful on a simple brown paper wrapped gift. Add a few vintage stick pins and a vintage tag and it is simply lovely.

Sometimes, we just need a little bit of lovely to perk up an old item.
I love the way this plain silver vase was transformed into a timeworn center piece with just a small length of vintage inky gauze trim. I added a simple crystal star stick pin to give it a finishing touch.
Wouldn't these be lovely little centerpieces for a garden tea party?


Enjoy these {PLAIN AND SIMPLE} ideas using the
{VINTAGE INKY GAUZE TRIM}


Related Posts Plugin for WordPress, Blogger...