Showing posts with label inky fabric. Show all posts

Sunday, March 4, 2012

{sneak peek}

    I am sorry that I have been {out of the loop} lately...

...I am in the process of creating an awesome new website and so with it comes much planning. I am hoping that you will all bear with me over the next few weeks as I assure you that the end result will be both beautiful and FUN!
For now - here is a sneak peek of some things I have been working on!


Thursday, September 15, 2011

{day 4 . a gauzy ruffled wool pouch}

Here I am with another project using this beautiful {inky vintage gauze trim}...

... and as adorable as I think it is, I must preclude this post with a confession. I love this little pouch because it's style closely resembles the beautiful little bags made by my friend, Roben-Marie over at Every Life Has A Story. She always creates the most beautiful bags and journals. I love everything she does...

...so while I did not start out this little bag thinking that it would look like one of hers, it just took a turn somewhere along the way because that is my favorite style.
 I was actually practicing a little sewing and one thing led to the next...
 ...I even remembered to line the bag - well half of the bag. Yes, you heard me right. I only made enough liner for one half of the bag...don't ask, because I just don't know!
 ...hence, the practice pouch.
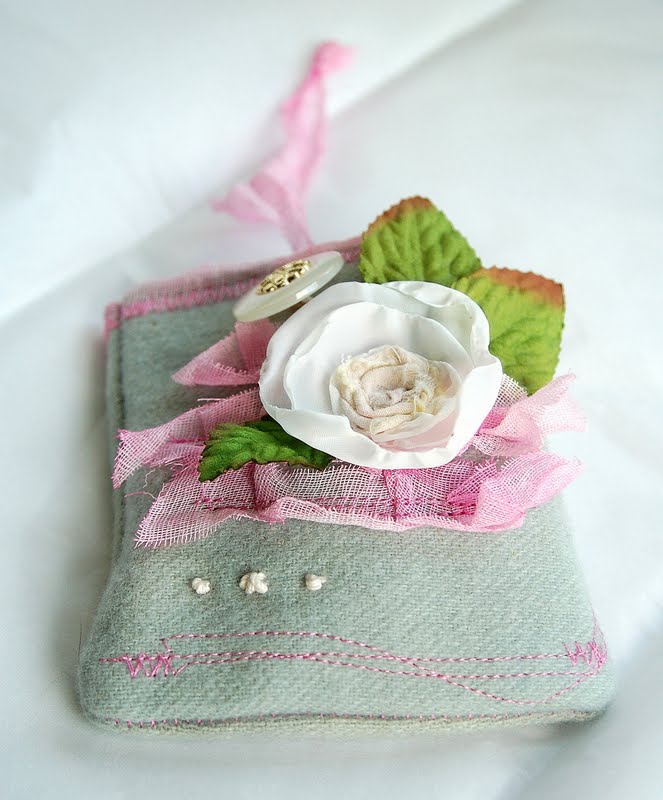
 I used some hand dyed wool I had leftover from a recent pillow project, and added three yummy rows of that sweet and simple {vintage hand dyed trim} that I have been featuring in my etsy shoppe, all week long.
 I layered on a ruffled silk flower I made with a center that I created using leftover dyed muslin.
 I did a little free form stitching {love it} on the front panel of the wool...
 added some leaves, a vintage button, and some french knots tied with some vintage baker's twine I had in my stash...I used another piece of the {peony vintage dyed gauze trim}to create a tie. I use this to wrap around the button for a casual closure to the pouch.
 More {vintage gauze} in that delicious {peony color} was used as a lip on the pouch, for the finishing trim. While digging in my treasure trove of old thread, I found some pink silk that was actually in great condition...Love it!

 Lovely photograph showing the top panel of this little pouch lined...bottom panel NOT lined...
You can also see that my stitching is not perfect, but it is okay. I like the "timeworn" look.
{that is what I like to call it when I can't sew so great - "timeworn!"}
A hand dyed piece of muslin, in pale mustard adorns the bottom back panel. I hand stamped it with a stamp that I actually carved at a recent retreat with friends. I LOVE IT!
...so it is not a perfect pouch, but a practice pouch...and I think it is super sweet!
The look of it is just what I wanted...my daughter is already asking for it for her birthday!
That made me feel pretty good...half liner and all!
And as always, if you make a project with any of the new {vintage inky gauze trim}
from the etsy shoppe I would love to see a photograph! I will even post it here!

Monday, September 12, 2011

{day 2 vintage gauze trim equals super sweet packaging}

I love the packaging of gifts. I could wrap things all day...I get great {JOY} each time I make a special little something and then {WRAP} it all up beautifully! It is almost like getting {TWO PRESENTS IN ONE} when you receive a  gift in precious wrappings.

My new inky gauze vintage trim makes for such a lovely finishing touch on a package. I love the way it looks so time worn and loved.  
This simple brown kraft gift box looks sweet with a piece of dyed vintage seam binding (coming soon to the 723 etsy shoppe) and a vintage lace rosette. Add lovely vintage hat pin and it is a gift worth beholding.


Whether it is a gift, a beautiful piece of mail art, or a simple vase you want to dress up, this vintage style trim adds just the right touch. A double wrap of  this dreamy {CORNFLOWER BLUE} gauzy ribbon looks beautiful on a simple brown paper wrapped gift. Add a few vintage stick pins and a vintage tag and it is simply lovely.

Sometimes, we just need a little bit of lovely to perk up an old item.
I love the way this plain silver vase was transformed into a timeworn center piece with just a small length of vintage inky gauze trim. I added a simple crystal star stick pin to give it a finishing touch.
Wouldn't these be lovely little centerpieces for a garden tea party?


Enjoy these {PLAIN AND SIMPLE} ideas using the
{VINTAGE INKY GAUZE TRIM}


Sunday, September 11, 2011

{inky gauze rosette earrings tutorial}

A yummy new batch of inky vintage gauze trim just hit the etsy shop shelves and I couldn't wait to share this {SWEET & SIMPLE} earring tutorial with you all.

These charming little rosette studs are easy and quick. You will want to make a dozen pairs! They only took me a half hour to complete, including gathering my supplies...so grab some {VINTAGE TRIM HERE} before it is all gone!


First, gather your supplies. Don't worry about having each item in the photograph...as long as you have the inky vintage trim you can use anything you love or have on hand to embellish your rosette...you will need:
 *scissors
 *glue gun or strong adhesive of your   choice
 *silicone pad for creating a circle of hot glue
  * two earring posts and two backs
  * something you would like to use to cut out your leaves from.(this can be cardstock, fabric, canvas, or anything else that will give you a good leafy texture) I used a leftover prima leaf I had on hand.
  *small hole punch (size will depend on how large you create your rosette)
 OPTIONAL: tweezers, string or yarn, rhinestones, buttons, etc.

For my rosette earrings, I cut two 6 inch lengths of {plum pudding inky vintage trim}
and tied a small knot in the end of each piece. Trim end of knots. 
 Next, using your silicone glue gun pad, create a small circle of hot glue. 
 Make sure it is pretty thick. Squeezing gently with constant light pressure works best. 

Place your knot in the center of the glue and let it set for 10-20 seconds. This just helps the glue gel a little bit.
Now start GENTLY twisting and wrapping your inky gauze trim around the center know, patting it in close to the trim it is wrapped around. You want a nice tight rosette when you are finished. Continue wrapping until your trim has covered your entire glue dot and then trim with scissors. Press flat gently and peel SLOWLY off of the mat. Tack end of trim to back side of rosette.

Now take your fabric or cardstock or leaf material and cut four small leaf shapes. These DO NOT have to be perfect. Flowers in the wild are not perfect and this gives your earrings character. 

Choose two leaves and layer them until you have your desired effect. Glue them together.
Set your leaves aside and go back to your rosette. Use whatever embellishment you like here (or none if you like...the pair I wear has NO BLING or anything, just SWEET AND SIMPLE!) and add it to your rosette's center. I used some inky dyed string for my center (coming soon to etsy shop) to give my center a little nesty look. Just twist and twirl the string until you have the shape you want and tack down with a dot of hot glue. Then I added a small rhinestone with a dot of hot glue.
Now take some old leftover cardstock or thin cardboard. ( I used some recycled packaging from my rhinestones ) Punch two circles and adhere one to the back of each earring. This will help disguise all of your layers of glue and leaves and flower.
Now take your earring post and clue that to the center of your cardstock. Let dry for a few minutes or until hot glue has completely cooled.
Your beautiful {INKY VINTAGE GAUZE TRIM} has been transformed into a darling pair of rosette earrings.


Enjoy! 


Related Posts Plugin for WordPress, Blogger...